
Most Cocoa applications are powered by the Model-View-Controller pattern, MVC for short. MVC is easy to understand and has very little overhead. But those that have used the Model-View-Controller pattern for some time know that it isn't perfect. Not even close. The Model-View-ViewModel pattern offers an interesting alternative.
It is important to understand that the Model-View-ViewModel pattern extends the Model-View-Controller pattern. It isn't a dramatic paradigm shift if you are used to MVC. Even though the advantages of MVVM are subtle, they are profound. What are some of the advantages MVVM has over MVC?
Better Separation of Concerns
In a project built with the Model-View-Controller pattern, you are often faced with the question which code goes where. Code that doesn’t fit or belong in the model or view layer is often put in the controller layer. This inevitably leads to fat controllers that are difficult to test and manage.
The MVVM pattern presents a better separation of concerns by adding view models to the mix. The view model translates the data of the model layer into something the view layer can use. The controller is no longer responsible for this task.
Improved Testability
View controllers are notoriously hard to test because of their relation to the view layer. By migrating data manipulation to the view model, testing becomes much easier. Testing view models is easy. Because a view model doesn’t have a reference to the object it is owned by, it easy to write unit tests for a view model.
Another, and often overlooked, benefit of MVVM is improved testability of view controllers. The view controller no longer depends on the model layer, which makes them easier to test.
Transparent Communication
The responsibilities of the view controller are reduced to controlling the interaction between the view layer and the model layer, glueing both layers together.
The view model provides a transparant interface to the view controller, which it uses to populate the view layer and interact with the model layer. This results in a transparant communication between the four layers of your application.

There are six rules that you need to know about when using the Model-View-ViewModel pattern in a project. Consider these rules as guidelines. While they can be tweaked or modified, as I show in Mastering Model-View-ViewModel With Swift, they form a solid foundation when applying MVVM in a project.
Rule 1
The view does not know about the controller it is owned by. Remember that views are supposed to be dumb. They only know how to present the data they are given to the user.
Rule 2
The controller does not know about the model. This is what separates MVC from MVVM.

Rule 3
The model does not know about the view model it is owned by.

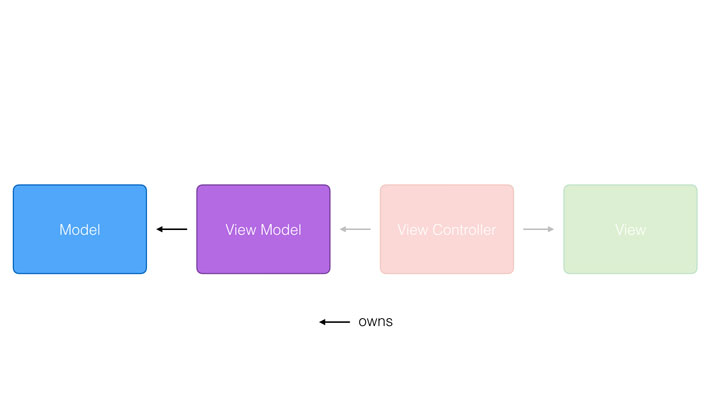
Rule 4
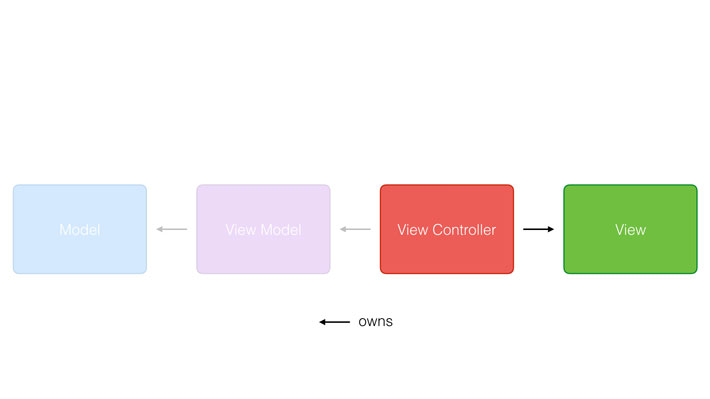
The view model owns the model. When using the Model-View-Controller pattern, the model is usually owned by the controller.
Rule 5
The view controller owns the view. This relationship remains unchanged when using the Model-View-ViewModel pattern.

Rule 6
And, finally, the controller owns the view model. It interacts with the model layer through one or more view models.

I want to reiterate that these rules are not set in stone, but it is important to make sure you don’t compromise the separation of concerns the Model-View-ViewModel pattern is built upon.
A Change of Mindset
Swift has accelerated the adoption of the Model-View-ViewModel pattern. I use MVVM in every new project I start and it has changed the way I write and think about code. If you haven't tried out MVVM yet, then I strongly recommend that you do.
Need help? Learn how to implement MVVM with Swift in Mastering Model-View-ViewModel With Swift. I promise that you won't regret it.