In the previous episode, we created a scene-based application using Xcode's new Single View App template. The target's Info.plist contains a key with name Application Scene Manifest, indicating that the application adopts the scene-based API. The value is a dictionary with two keys, Enable Multiple Windows and Scene Configuration. The value of Enable Multiple Windows is set to NO by default.
Adding Support for Multiple Windows
To better understand the user interface life cycle of scene-based applications, we enable support for multiple windows. We can set the value for Enable Multiple Windows to YES in the target's Info.plist, but there's also another option.
Open the Project Navigator on the left and select the Windows project. Choose the Windows target from the Targets section and select the General tab at the top. You can enable support for multiple windows by checking the Supports multiple windows checkbox in the Deployment Info section. Xcode automatically updates the target's Info.plist. Click Configure to open the target's Info.plist.
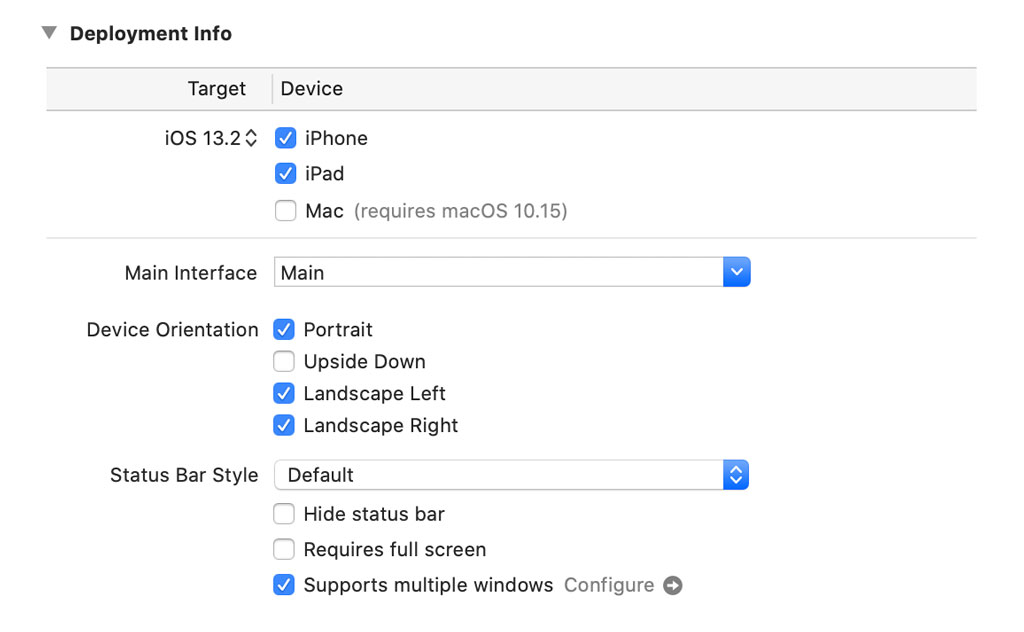
Notice that Enable Multiple Windows is set to YES. This means that the application supports multiple windows on iPadOS. We revisit the target's Info.plist in a few moments.

Exploring the User Interface Life Cycle
Open AppDelegate.Swift. Notice that I added four methods of the UIApplicationDelegate protocol to the AppDelegate class, applicationDidBecomeActive(_:), applicationWillResignActive(_:), applicationWillEnterForeground(_:), and applicationDidEnterBackground(_:). These methods should look familiar. Each method of the AppDelegate class contains a print statement. These print statements come in useful when we explore the user interface life cycle in a few moments.
import UIKit

@UIApplicationMain
class AppDelegate: UIResponder, UIApplicationDelegate {

    // MARK: - Application Life Cycle

    func application(_ application: UIApplication, didFinishLaunchingWithOptions launchOptions: [UIApplication.LaunchOptionsKey: Any]?) -> Bool {
        print("APPLICATION DID FINISH LAUNCHING")

        return true
    }

    func applicationWillTerminate(_ application: UIApplication) {
        print("APPLICATION WILL TERMINATE")
    }

    // MARK: -

    func applicationDidBecomeActive(_ application: UIApplication) {
        print("APPLICATION DID BECOME ACTIVE")
    }

    func applicationWillResignActive(_ application: UIApplication) {
        print("APPLICATION WILL RESIGN ACTIVE")
    }

    func applicationWillEnterForeground(_ application: UIApplication) {
        print("APPLICATION WILL ENTER FOREGROUND")
    }

    func applicationDidEnterBackground(_ application: UIApplication) {
        print("APPLICATION DID ENTER BACKGROUND")
    }

    // MARK: - Scene Session Life Cycle

    func application(_ application: UIApplication, configurationForConnecting connectingSceneSession: UISceneSession, options: UIScene.ConnectionOptions) -> UISceneConfiguration {
        print("APPLICATION CONFIGURATION FOR CONNECTING SCENE SESSION")

        return UISceneConfiguration(name: "Default Configuration", sessionRole: connectingSceneSession.role)
    }

    func application(_ application: UIApplication, didDiscardSceneSessions sceneSessions: Set<UISceneSession>) {
        print("APPLICATION DID DISCARD SCENE SESSIONS")
    }

}
Open SceneDelegate.swift in the Assistant Editor on the right. I also added a print statement to each method of the SceneDelegate class.
import UIKit

class SceneDelegate: UIResponder, UIWindowSceneDelegate {

    // MARK: - Properties

    var window: UIWindow?

    // MARK: - Window Scene Delegate

    func scene(_ scene: UIScene, willConnectTo session: UISceneSession, options connectionOptions: UIScene.ConnectionOptions) {
        print("SCENE WILL CONNECT TO SESSION")

        guard let _ = (scene as? UIWindowScene) else { return }
    }

    func sceneDidDisconnect(_ scene: UIScene) {
        print("SCENE DID DISCONNECT")
    }

    // MARK: -

    func sceneDidBecomeActive(_ scene: UIScene) {
        print("SCENE DID BECOME ACTIVE")
    }

    func sceneWillResignActive(_ scene: UIScene) {
        print("SCENE WILL RESIGN ACTIVE")
    }

    func sceneWillEnterForeground(_ scene: UIScene) {
        print("SCENE WILL ENTER FOREGROUND")
    }

    func sceneDidEnterBackground(_ scene: UIScene) {
        print("SCENE DID ENTER BACKGROUND")
    }

}
Application Did Finish Launching
Build and run the application in an iPad simulator and inspect the output in Xcode's console. The first line shouldn't be surprising. As I explained in the previous episode, the UIApplication singleton notifies its delegate when the application has finished launching. This gives the application delegate the opportunity to prepare the application for use.
APPLICATION DID FINISH LAUNCHING
Creating a Scene Configuration
The second line isn't surprising either if you read or watched the previous episode. The application asks the application delegate for a UISceneConfiguration instance to create a scene. Remember that a scene is synonymous with a user interface instance of your application.
APPLICATION CONFIGURATION FOR CONNECTING SCENE SESSION
Let's take a moment to explore the implementation of application(_:configurationForConnecting:options:). Apart from the print statement we added, the implementation contains a single line of code. The application delegate creates an instance by invoking the init(name:sessionRole:) initializer. The first argument of the initializer is the name of the scene configuration. UIKit searches the application's Info.plist for a scene configuration with that name and uses it to create a UISceneConfiguration instance.
Revisit the target's Info.plist. It's time to take a closer look at the value of the Scene Configuration key. The value is a dictionary with one key, Application Session Role. The value of Application Session Role is an array of scene configurations.
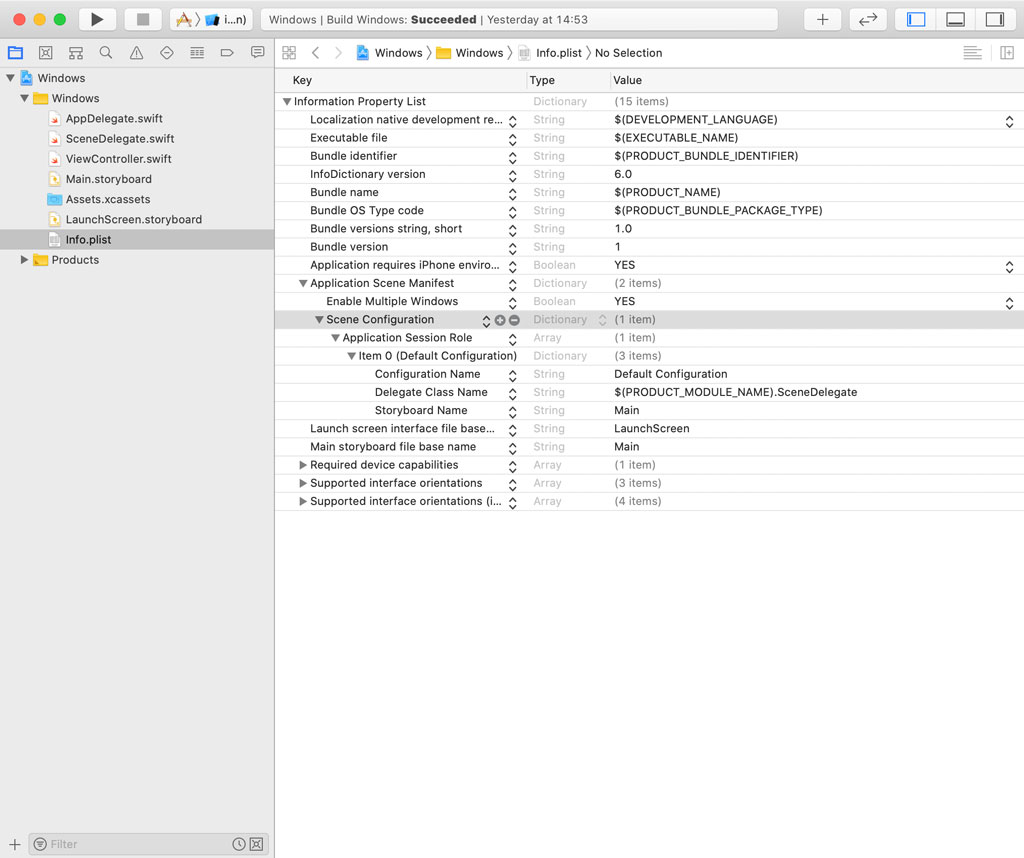
You don't need to worry about roles unless you build an application that supports CarPlay or your application is displayed on an external screen. The array is what interests us. It contains one or more scene configurations. It currently contains one scene configuration, a dictionary with three key-value pairs, (1) the name of the configuration, (2) the class of the scene's delegate, and (3) the storyboard that contains the initial view controller of the scene. It can contain a fourth key-value pair, (4) the class of the scene.
Let's return to the AppDelegate class. A scene configuration defines the class of the scene, the class of the scene's delegate, and the storyboard that contains the initial view controller of the scene. UIKit loads the scene configuration from the target's Info.plist and uses it to create a UISceneConfiguration instance. The second argument of the initializer is the role. You always pass the role property of the UISceneSession instance as the second argument of the initializer.
func application(_ application: UIApplication, configurationForConnecting connectingSceneSession: UISceneSession, options: UIScene.ConnectionOptions) -> UISceneConfiguration {
    print("APPLICATION CONFIGURATION FOR CONNECTING SCENE SESSION")

    return UISceneConfiguration(name: "Default Configuration", sessionRole: connectingSceneSession.role)
}
Apple encourages developers to define scene configurations in the application's Info.plist, but know that it's possible to dynamically create a scene configuration. You can, for example, load a scene configuration from the application's Info.plist, modify it, and return it from application(_:configurationForConnecting:options:). Most of the time, however, you define the scene configurations for your application in the target's Info.plist and use them with modifying them at runtime.
Connecting to a Scene Session
The third line in Xcode's console is new. The application delegate was asked for a scene configuration. UIKit uses the scene configuration to (1) create a scene, (2) create and assign a scene delegate for that scene, and (3) instantiate the initial view controller for the scene.
After creating and configuring the scene, UIKit connects the scene to the application. In scene(_:willConnectTo:options:), the scene delegate has the opportunity to prepare the scene for display to the user. You could see this method as the equivalent of the application(_:didFinishLaunchingWithOptions:) method. The application is prepared for use in application(_:didFinishLaunchingWithOptions:) while the user interface is prepared for use in scene(_:willConnectTo:options:).
func scene(_ scene: UIScene, willConnectTo session: UISceneSession, options connectionOptions: UIScene.ConnectionOptions) {
    print("SCENE WILL CONNECT TO SESSION")

    guard let _ = (scene as? UIWindowScene) else { return }
}
The implementation of scene(_:willConnectTo:options:) is a bit cryptic. The guard statement indicates that the scene delegate is expecting and is only interested in a UIWindowScene instance.
guard let _ = (scene as? UIWindowScene) else { return }
The UIWindowScene class is a subclass of UIScene and is designed for managing a user interface instance of your application. Your application should never create a UIScene or UIWindowScene instance. UIKit takes care of that for you.
The second argument of the scene(_:willConnectTo:options:) method is of type UISceneSession. A UISceneSession instance manages a scene. It has a persistent identifier and it configures the scene it manages. Scene sessions are created by UIKit. We discuss the UISceneSession class in more detail in the next episode.
Scene Will Enter Foreground
The last two lines in Xcode's console might surprise you. On iOS 12 and earlier, the application delegate is notified when an application enters the foreground and becomes active. That is not true for scene-based applications. Each scene has a delegate object and it is the delegate object that is notified of user interface life cycle events. We covered this in the previous episode.
When the scene is displayed to the user, the scene notifies its delegate by invoking sceneWillEnterForeground(_:) and sceneDidBecomeActive(_:).
SCENE WILL ENTER FOREGROUND
SCENE DID BECOME ACTIVE
Swipe up from the bottom of the screen to bring up the application switcher. The scene invokes the sceneWillResignActive(_:) method of the scene delegate to notify it that the scene is no longer active.
SCENE WILL RESIGN ACTIVE
If we open another application, then the scene is pushed to the background and the scene invokes the sceneDidEnterBackground(_:) method of the scene delegate. Tap Safari in the dock to open it. The output in Xcode's console confirms that the scene of the application is pushed to the background.
SCENE DID ENTER BACKGROUND
Scene Did Disconnect
There is one method of the SceneDelegate class we haven't covered, sceneDidDisconnect(_:). This method is invoked when the system disconnects an inactive scene to free up memory or when the user explicitly discards a scene from the application switcher. This doesn't mean that your application is about to be terminated. Remember that the application life cycle and the user interface life cycle of a scene-based application are no longer tightly coupled.
We take a closer look at the sceneDidDisconnect(_:) method when we discuss state restoration. Remember that state restoration is no longer optional or a nice to have. It is an integral component of scene-based applications.
Multiple Windows
Each scene session has a persistent identifier that uniquely identifies the scene session. Let's print the persistent identifier of the scene session in the scene(_:willConnectTo:options:) method.
func scene(_ scene: UIScene, willConnectTo session: UISceneSession, options connectionOptions: UIScene.ConnectionOptions) {
    print("SCENE WILL CONNECT TO SESSION \(session.persistentIdentifier)")

    guard let _ = (scene as? UIWindowScene) else { return }
}
Build and run the application in an iPad simulator. The persistent identifier of the scene session is printed to Xcode's console.
APPLICATION DID FINISH LAUNCHING
SCENE WILL CONNECT TO SESSION F388E340-81B3-4CD6-AB97-7554F88459FF
SCENE WILL ENTER FOREGROUND
SCENE DID BECOME ACTIVE
Open the application switcher by swiping up from the bottom of the screen. Tap the application icon to show every scene of the application. Notice that a + button appears in the top right of the screen. Tap the + button to create a new scene for the application. Take a look at the output in Xcode's console. The persistent identifier of the scene session differs from that of the scene session the application launched with.
APPLICATION CONFIGURATION FOR CONNECTING SCENE SESSION
SCENE WILL CONNECT TO SESSION 5C607D80-9EB3-4A0C-ACF0-18F16F5DD91A
SCENE WILL ENTER FOREGROUND
SCENE DID BECOME ACTIVE
Before we end this episode, I want to show you what the object graph of the application looks like. Click the Debug Memory Graph button in the debug bar at the bottom. Click the button on the right of the search field to only show objects from the workspace. The objects listed in the Debug Navigator on the right summarize what we covered in this and the previous episode.
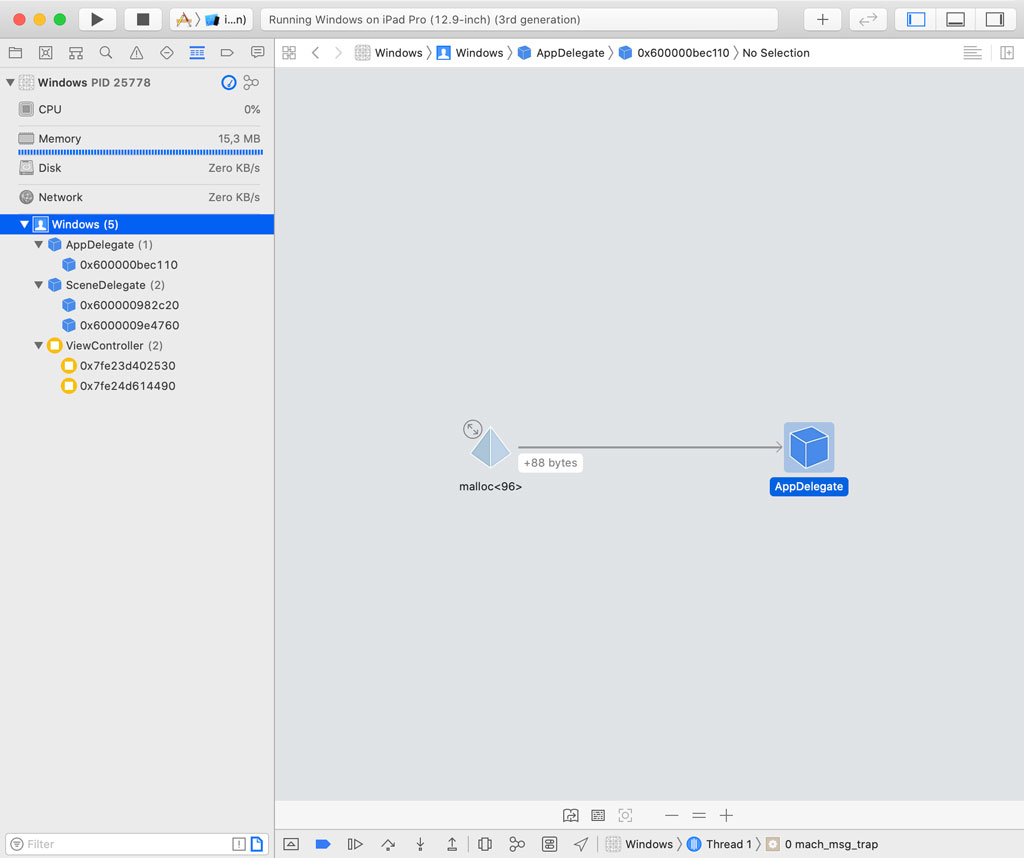
The application has one application delegate. We created two scenes, which means the Debug Navigator lists two SceneDelegate instances. Notice that each scene has its own view hierarchy and view controllers. The Debug Navigator lists two ViewController instances, one for each scene.
iOS 12 and Earlier
Even though the scene-based API is only available on iOS 13 and later, it is possible to run a scene-based application on iOS 12 and earlier. On iOS 12 and earlier, the application delegate continues to be responsible for managing the user interface life cycle. UIKit only notifies the scene delegate of user interface life cycle events if (1) the application is scene-based and (2) the device has iOS 13 or later installed.
What's Next?
We have used an application that supports multiple windows on iPad to learn more about scene-based applications, but know that everything we covered also applies to applications that don't support iPad or multiple windows. The next episode focuses on state restoration, an essential component of scene-based applications.