The locations view displays a static list of locations. While that has been useful to implement the user interface of the locations view, in the next few episodes we focus on adding locations.
Presenting the Add Location View
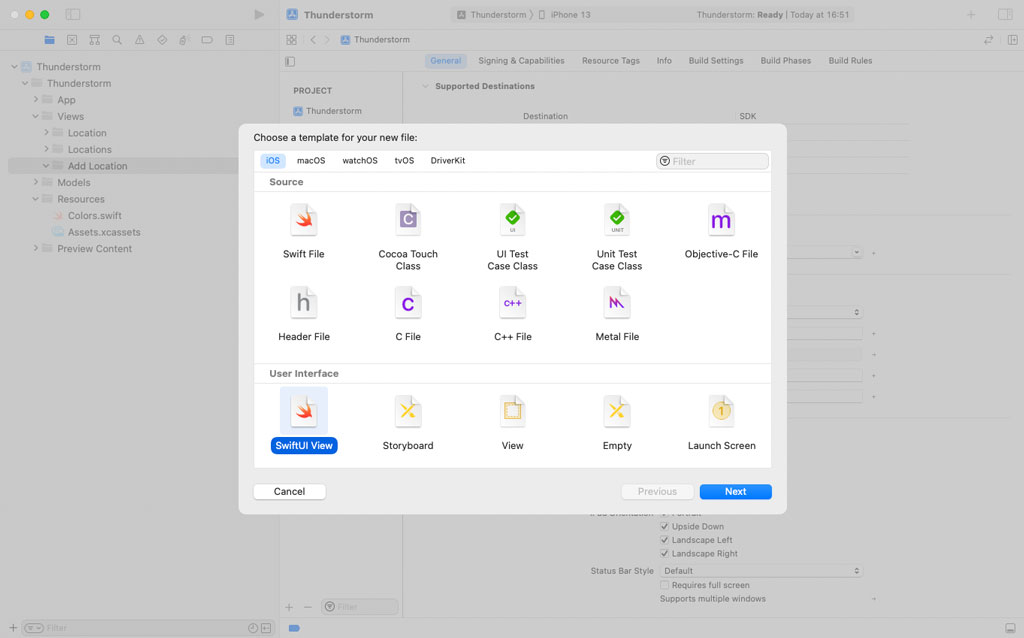
The user can add a location to the locations view through the add location view. Add a group to the Views group and name it Add Location. Add a SwiftUI view to the Add Location group by choosing the SwiftUI View template from the iOS > User Interface section. Name the file AddLocationView.swift.
import SwiftUI

struct AddLocationView: View {

    // MARK: - View

    var body: some View {
        Text("Add Location")
    }

}

struct AddLocationView_Previews: PreviewProvider {
    static var previews: some View {
        AddLocationView()
    }
}
Every view that displays data is driven by a view model so we define a view model for the add location view. Add a group to the Add Location group and name it View Models. Add a Swift file to the View Models group and name it AddLocationViewModel.swift.
Declare an internal, final class with name AddLocationViewModel. Why AddLocationViewModel is a class and not a struct becomes clear later in this episode.
import Foundation

internal final class AddLocationViewModel {

}
Revisit AddLocationView.swift, declare a constant property, viewModel, of type AddLocationViewModel, and update the static previews property of the AddLocationView_Previews struct. The view model of the add location view is injected through the initializer.
import SwiftUI

struct AddLocationView: View {

    // MARK: - Properties

    let viewModel: AddLocationViewModel

    // MARK: - View

    var body: some View {
        Text("Add Location")
    }

}

struct AddLocationView_Previews: PreviewProvider {
    static var previews: some View {
        AddLocationView(viewModel: .init())
    }
}
The add location view is presented when the user taps a button on the locations view. Open LocationsView.swift. Add a Button to the vertical grid before the list of locations. The initializer of the button accepts a string, the title of the button, and a closure that is invoked when the button is tapped. The title of the button is provided by the view model.
var body: some View {
    NavigationView {
        ScrollView {
            LazyVGrid(columns: [GridItem()], spacing: 20.0) {
                Button("") {

                }

                ForEach(viewModel.locationCellViewModels) { viewModel in
                	...
                }
            }
            .padding()
        }
        .navigationTitle("Thunderstorm")
    }
}
Open LocationsViewModel.swift and declare a computed property, addLocationTitle, of type String. The computed property returns a string literal.
import Foundation

struct LocationsViewModel {

    // MARK: - Properties

    var title: String {
        "Thunderstorm"
    }

    var addLocationTitle: String {
        "Add a Location"
    }

    var locationCellViewModels: [LocationCellViewModel] {
        Location.previews.map(LocationCellViewModel.init)
    }

}
Revisit LocationsView.swift and pass the value of the computed addLocationTitle property to the initializer of the Button struct.
var body: some View {
    NavigationView {
        ScrollView {
            LazyVGrid(columns: [GridItem()], spacing: 20.0) {
                Button(viewModel.addLocationTitle) {

                }

                ForEach(viewModel.locationCellViewModels) { viewModel in
                	...
                }
            }
            .padding()
        }
        .navigationTitle("Thunderstorm")
    }
}
The add location view is presented as a sheet. The sheet view modifier requires a binding so we need to take care of that requirement first. Declare a private, variable State property with name showsAddLocationView and set its initial value to false.
import SwiftUI

struct LocationsView: View {

    // MARK: - Properties

    let viewModel: LocationsViewModel

    @State private var showsAddLocationView = false

    // MARK: - View

    var body: some View {
        ...
    }

}
We apply the sheet view modifier to the scroll view, passing in a binding, that is, the projected value of the showsAddLocationView property. The sheet(isPresented:onDismiss:content:) method accepts a view builder as its second argument. We have worked with view builders before. The view builder should return the view that is presented when showsAddLocationView is set to true. This means we create an AddLocationView object in the view builder and return it.
var body: some View {
    NavigationView {
        ScrollView {
            ...
        }
        .navigationTitle("Thunderstorm")
        .sheet(isPresented: $showsAddLocationView) {
            AddLocationView(viewModel: .init())
        }
    }
}
In the action of the Add a Location button, we toggle the value of the showsAddLocationView property.
var body: some View {
    NavigationView {
        ScrollView {
            LazyVGrid(columns: [GridItem()], spacing: 20.0) {
                Button(viewModel.addLocationTitle) {
                    showsAddLocationView.toggle()
                }

                ForEach(viewModel.locationCellViewModels) { viewModel in
                    ...
                }
            }
            .padding()
        }
        .navigationTitle("Thunderstorm")
        .sheet(isPresented: $showsAddLocationView) {
            AddLocationView(viewModel: .init())
        }
    }
}
We can test the implementation in the live preview on the right. The add location view is presented when we tap the Add a Location button. We can dismiss the add location view by dragging it down.
Before we focus on the add location view, I would like to make the Add a Location button a bit more prominent. We add padding to the button, set the foreground color to white, set the background color to the application's accent color, and set the clipping shape for the button to a capsule shape by applying the clipShape view modifier. It is important that you apply the view modifiers in this order. If you apply the background view modifier last, for example, you end up with a rectangular button instead of a button with rounded corners.
Button(viewModel.addLocationTitle) {
    showsAddLocationView.toggle()
}
.padding()
.foregroundColor(.white)
.background(Color.accentColor)
.clipShape(Capsule())
Populating the Add Location View
Open AddLocationView.swift. The add location view displays a text field the user can use to search for the location they want to add to the locations view. The view model of the add location view uses the Core Location framework to find locations that match the string the user entered in the text field. The results of the query are displayed as a list below the text field. The user taps a location to add it to the locations view.
We first add the text field to the add location view. Replace the Text view with a VStack and add a TextField to the VStack. The initializer of the TextField struct accepts a placeholder as its first argument and a binding as its second argument. The placeholder is displayed if the text field is empty.
Open AddLocationViewModel.swift and declare a computed property, textFieldPlaceholder, of type String. The computed property returns a string literal.
import Foundation

internal final class AddLocationViewModel {

    // MARK: - Properties

    var textFieldPlaceholder: String {
        "Enter the name of a city ..."
    }

}
The view model also provides the binding for the text field. Declare a Published property with name query and set its initial value to an empty string.
import Foundation

internal final class AddLocationViewModel {

    // MARK: - Properties

    @Published var query = ""

    var textFieldPlaceholder: String {
        "Enter the name of a city ..."
    }

}
Revisit AddLocationView.swift. We pass the placeholder provided by the view model as the first argument of the initializer and the projected value of the query property as the second argument of the initializer. Add a bit of padding to the TextField to give it some space.
import SwiftUI

struct AddLocationView: View {

    // MARK: - Properties

    let viewModel: AddLocationViewModel

    // MARK: - View

    var body: some View {
        VStack {
            TextField(viewModel.textFieldPlaceholder, text: $viewModel.query)
        }
    }

}
There is one problem we need to address. The view's view model needs to be observable. This is an easy change. Open AddLocationViewModel.swift and conform the AddLocationViewModel class to the ObservableObject protocol. That is why AddLocationViewModel is a class, not a struct.
import Foundation

internal final class AddLocationViewModel: ObservableObject {

    // MARK: - Properties

    @Published var query = ""

    var textFieldPlaceholder: String {
        "Enter the name of a city ..."
    }

}
In AddLocationView.swift, we apply the ObservedObject property wrapper to the viewModel property to make it observable. Because the ObservedObject property wrapper can only be applied to variables, we replace let with var.
import SwiftUI

struct AddLocationView: View {

    // MARK: - Properties

    @ObservedObject var viewModel: AddLocationViewModel

    // MARK: - View

    var body: some View {
        VStack {
            TextField(viewModel.textFieldPlaceholder, text: $viewModel.query)
        }
    }

}
The results of the query are displayed in a List view below the text field. We start by creating a view for the items of the List view. Add a SwiftUI view to the Add Location group and name it AddLocationCell.swift.
import SwiftUI

struct AddLocationCell: View {

    // MARK: - View

    var body: some View {
        Text("Add Location Cell")
    }

}

struct AddLocationCell_Previews: PreviewProvider {
    static var previews: some View {
        AddLocationCell()
    }
}
Add a Swift file to the View Models group and name it AddLocationCellViewModel.swift. The view model for the AddLocationCell struct is straightforward. Declare a struct with name AddLocationCellViewModel. It exposes the properties of a Location object in a format the view can display.
import Foundation

struct AddLocationCellViewModel {

}
Declare a private property with name location of type Location. We also implement an initializer that accepts a Location object as its only argument. The initializer is necessary because we declared the location property privately.
import Foundation

struct AddLocationCellViewModel {

    // MARK: - Properties

    private let location: Location

    // MARK: - Initialization

    init(location: Location) {
        self.location = location
    }

}
We declare three computed properties of type String, name, country, and coordinates. The computed name and country properties return the name and country of the location respectively. The computed coordinates property uses string interpolation to format the latitude and longitude of the location.
import Foundation

struct AddLocationCellViewModel {

    // MARK: - Properties

    private let location: Location

    // MARK: - Initialization

    init(location: Location) {
        self.location = location
    }

    // MARK: - Public API

    var name: String {
        location.name
    }

    var country: String {
        location.country
    }

    var coordinates: String {
        "\(location.latitude), \(location.longitude)"
    }

}
Open AddLocationCell.swift and declare a constant property with name viewModel of type AddLocationCellViewModel. This means we also need to update the static previews property of the AddLocationCell_Previews struct. This should feel familiar by now.
import SwiftUI

struct AddLocationCell: View {

    // MARK: - Properties

    let viewModel: AddLocationCellViewModel

    // MARK: - View

    var body: some View {
        Text("Add Location Cell")
    }

}

struct AddLocationCell_Previews: PreviewProvider {
    static var previews: some View {
        AddLocationCell(viewModel: .init(location: .preview))
    }
}
Replace the Text view with a VStack with a leading alignment. The VStack contains three Text views. The first Text view displays the location's name, the second Text view displays the location's country, and the third Text view displays the location's coordinates. We set the font of the first Text view to headline and its foreground color to the application's accent color. We set the font of the second Text view to subheadline and its foreground color to gray. We set the font of the thrid Text view to caption and its foreground color to gray.
var body: some View {
    VStack(alignment: .leading) {
        Text(viewModel.name)
            .font(.headline)
            .foregroundColor(.accentColor)
        Text(viewModel.country)
            .font(.subheadline)
            .foregroundColor(.gray)
        Text(viewModel.coordinates)
            .font(.caption)
            .foregroundColor(.gray)
    }
}
With the AddLocationCell struct in pace, we can populate the add location view. We do that in the next episode.
What's Next?
You may have noticed that the locations view creates the view model for the add location view. As I explained earlier in this series, views shouldn't create view models. This is only temporary, though. We change that later in this series.