Every project I work on makes use of view controller containment. This isn't surprising since several UIKit components take advantage of this pattern, including navigation controllers, tab bar controllers, and split view controllers. But I'm not only referring to the components UIKit offers out of the box.
I'm referring to the root view controller of the application window. Let me explain what I mean. An application has a window and that window has a root view controller. That view controller can be a navigation controller, a tab bar controller, or a simple view controller. I always make the root view controller of the application window the parent view controller of one or more child view controllers.
About View Controller Containment
A container view controller manages a view just like any other UIViewController subclass. In addition to managing a view, a container view controller also manages one or more child view controllers. It acts as the parent view controller of one or more child view controllers.
The parent view controller is responsible for setting the size and position of the views of its child view controllers. The view of the child view controller becomes part of the parent view controller's view hierarchy.
That said, the child view controller continues to be responsible for its own view hierarchy and that is what gives view controller containment its power and flexibility. A navigation controller is reusable thanks to view controller containment. It knows how to manage a stack of view controllers, but it doesn't care how its child view controllers behave or what they present.
The same is true for a tab bar controller. It sizes and positions the views of its child view controllers, but it doesn't know or care how they behave or what they present. All it knows is how to manage them and how to navigate between them.
Why Use View Controller Containment
You may be wondering why it's useful or necessary to use view controller containment. The architecture I outline in this episode has several interesting advantages. The most obvious benefit is control. Take the following example.
At some point, the application may use Core Data to build a local cache. Most data models change over time, which means that the persistent store needs to be migrated from time to time. The time it takes to migrate a persistent store depends on a range of factors, including the amount of data stored in the persistent store, the complexity of the data model, and the capabilities of the device.
It's rarely a good idea to prevent the user from interacting with the application, but there are scenarios in which it's the right choice. Performing a Core Data migration is one of those scenarios. I won't go into the details in this episode.
When the application detects that the persistent store needs to be migrated, it can show the user a dedicated view controller that informs them about what's happening or show the user the progress of the migration. The dedicated view controller replaces the view controller that the user expects to see and prevents them from interacting with the application.
This is one example that illustrates the usefulness of view controller containment. The initial setup isn't complex and it doesn't impact how you build the rest of your application. Let me show you what it looks like.
Creating a Root View Controller
We start by removing ViewController.swift from the project. We won't be needing it. Create a group in the View Controllers group and name it Root View Controller. Create a UIViewController subclass and name it RootViewController. Add a storyboard with name Root.storyboard to the Storyboards group.
Open Root.storyboard and add a view controller from the Object Library. Select the view controller, open the Identity Inspector on the right, and set Class to RootViewController.
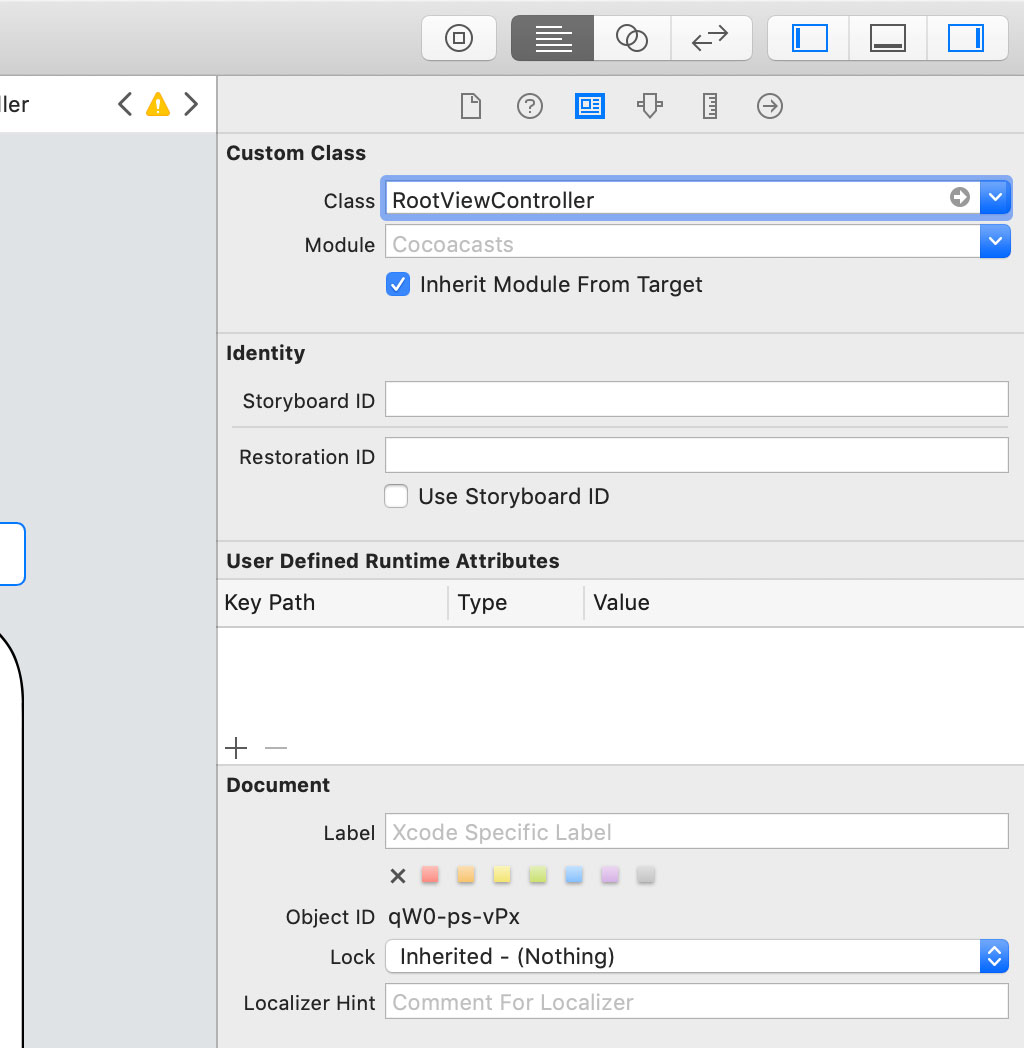
With the view controller selected, open the Attributes Inspector on the right and check the checkbox with label Is Initial View Controller.

Select the view controller's view, open the Attributes Inspector on the right, and set the view's background color to red. By setting the background color of the view controller's view to red, we can verify if everything is set up correctly.

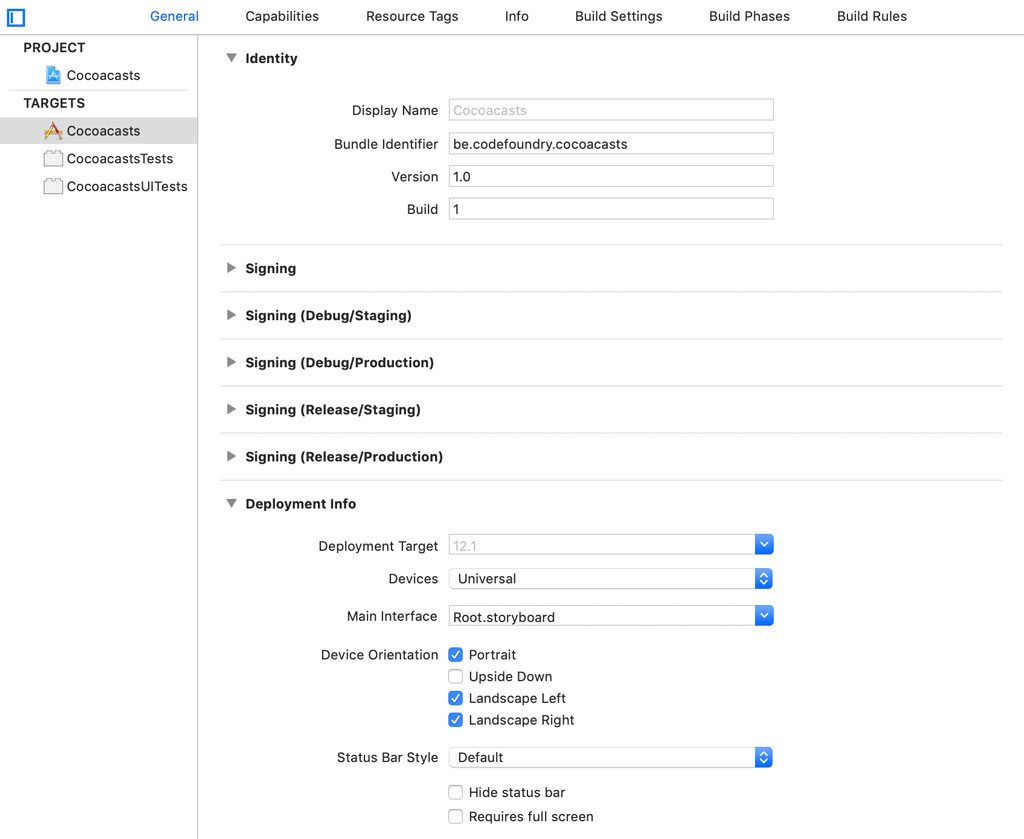
We need to make a small change before we can test the implementation. Select the project in the Project Navigator and choose the Cocoacasts target from the list of targets. Select the General tab at the top and, in the Deployment Info section, set Main Interface to Root.storyboard.
Build and run the application in the simulator or on a device. If you see a red view, then everything is set up correctly.

Creating a Tab Bar Controller
The root view controller presents content to the user through one or more child view controllers. It doesn't directly present content to the user. The user interface of the application will be dominated by a tab bar controller. That tab bar controller will be a child view controller of the root view controller. In other words, the root view controller will be the parent view controller of the tab bar controller.
We start with two tabs, feed and library. The feed shows the latest episodes published on the Cocoacasts website. The library shows episodes, categories, and collections. Create a group and name it Modules. Add a subgroup to the Modules group and name it Feed. The Feed group contains two subgroups, View Controllers and Storyboards. Storyboards are useful, but they often result in merge conflicts. You can avoid this to some extent by using several smaller storyboards instead of one large storyboard. That approach works well in combination with storyboard references.
Add a UIViewController subclass to the View Controllers group and name it FeedViewController. Add a storyboard to the Storyboards group and name it Feed.storyboard.
Open Feed.storyboard and add a view controller from the Object Library. Select the view controller, open the Identity Inspector on the right, and set Class to FeedViewController. With the view controller selected, open the Attributes Inspector on the right and check the checkbox with label Is Initial View Controller. Select the view controller's view, open the Attributes Inspector on the right, and set the view's background color to blue.
Open FeedViewController.swift and override the init(coder:) initializer. We invoke the implementation of the superclass and set the title of the view controller to Feed.
import UIKit

class FeedViewController: UIViewController {

    // MARK: - Initialization

    required init?(coder aDecoder: NSCoder) {
        super.init(coder: aDecoder)

        // Set Title
        title = "Feed"
    }

}
Add another group to the Modules group, Library, and add two subgroups, View Controllers and Storyboards. Add a UIViewController subclass to the View Controllers group and name it LibraryViewController. Add a storyboard to the Storyboards group and name it Library.storyboard.
Open Library.storyboard and add a view controller from the Object Library. Select the view controller, open the Identity Inspector on the right, and set Class to LibraryViewController. With the view controller selected, open the Attributes Inspector on the right and check the checkbox with label Is Initial View Controller. Select the view controller's view, open the Attributes Inspector on the right, and set the view's background color to green.
Open LibraryViewController.swift and override the init(coder:) initializer. We invoke the implementation of the superclass and set the title of the view controller to Library.
import UIKit

class LibraryViewController: UIViewController {

    // MARK: - Initialization

    required init?(coder aDecoder: NSCoder) {
        super.init(coder: aDecoder)

        // Set Title
        title = "Library"
    }

}
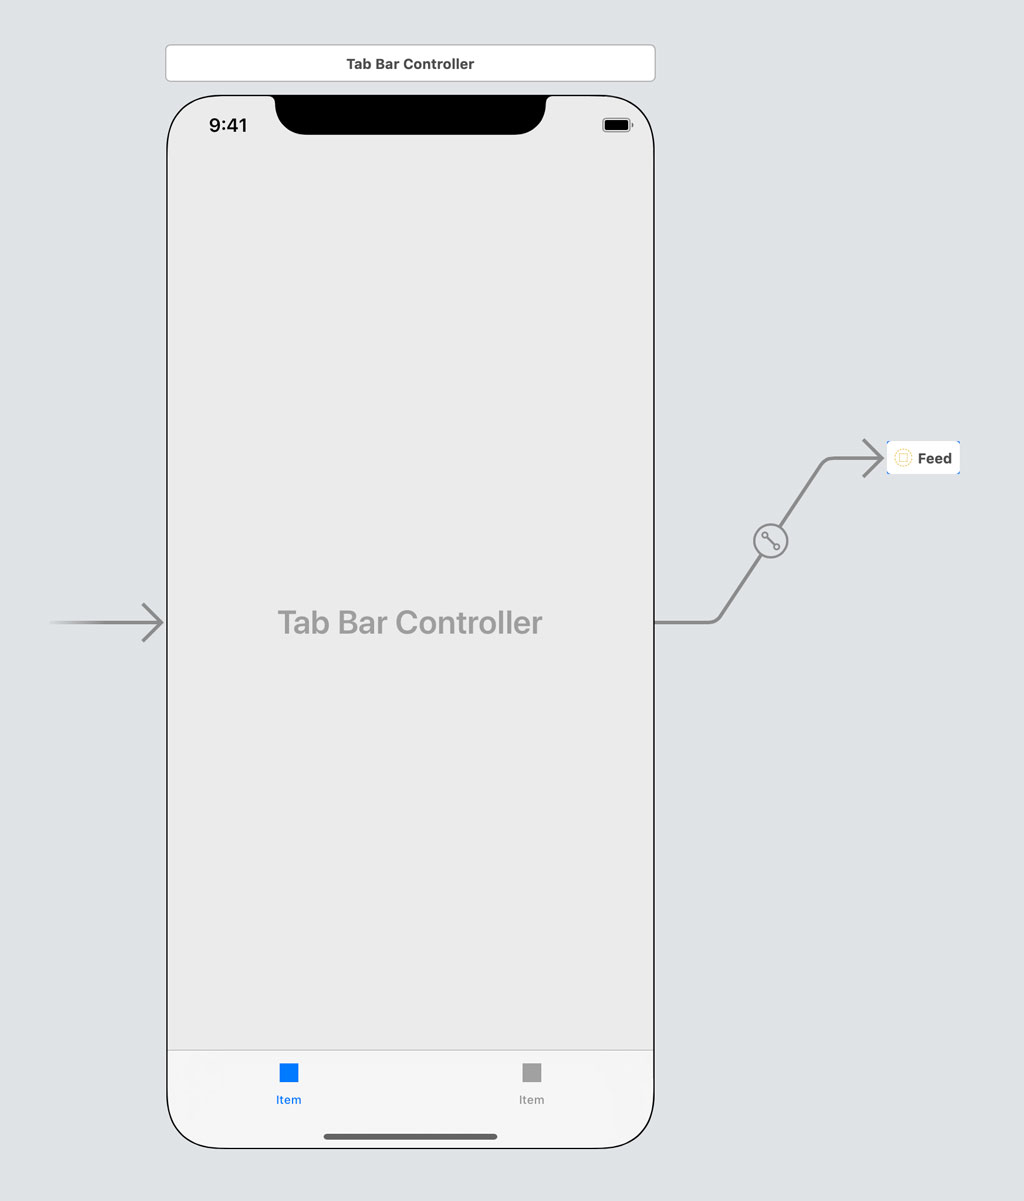
With the feed and library view controllers in place, it's time to create and configure the tab bar controller. Open Main.storyboard, remove the view controller, and add a tab bar controller from the Object Library. Select the tab bar controller, open the Attributes Inspector on the right, and check the checkbox labeled Is Initial View Controller. Remove the child view controllers of the tab bar controller.

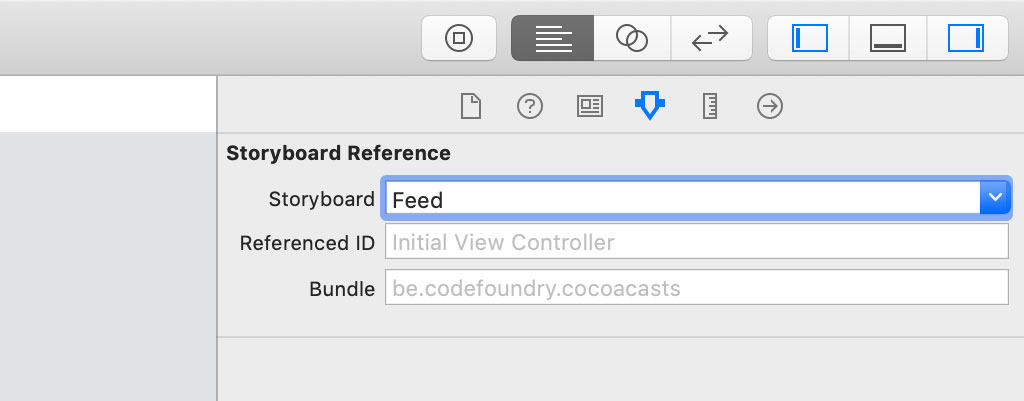
Add a storyboard reference from the Object Library and set Storyboard to Feed in the Attributes Inspector on the right.
Select the tab bar controller in Main.storyboard, press Control, and drag to the storyboard reference. Choose view controllers in the Relationship Segue section from the menu that pops up.
Add another storyboard reference from the Object Library and set Storyboard to Library in the Attributes Inspector on the right.

Select the tab bar controller in Main.storyboard, press Control, and drag to the storyboard reference. Choose view controllers in the Relationship Segue section from the menu that pops up.

Setting Up a Child View Controller
The last step is adding the tab bar controller as a child view controller to the root view controller. Open RootViewController.swift and create a private, lazy, variable property, viewController, of type UITabBarController. I would have liked to name the property tabBarController, but that property is declared in the UIViewController class. We load the contents of Main.storyboard and instantiate the initial view controller, that is, the tab bar controller. We cast the result to an instance of the UITabBarController class. We throw a fatal error if that fails because that should never happen.
import UIKit

class RootViewController: UIViewController {

    // MARK: - Properties

    private lazy var viewController: UITabBarController = {
        guard let tabBarController = UIStoryboard(name: "Main", bundle: .main).instantiateInitialViewController() as? UITabBarController else {
            fatalError("Unable to Instantiate Tab Bar Controller")
        }

        return tabBarController
    }()

    // MARK: - View Life Cycle

    override func viewDidLoad() {
        super.viewDidLoad()
    }

}
In viewDidLoad() we invoke a helper method, setupChildViewControllers().
// MARK: - View Life Cycle

override func viewDidLoad() {
    super.viewDidLoad()

    // Setup Child View Controllers
    setupChildViewControllers()
}
The setupChildViewControllers() method is responsible for adding the tab bar controller as a child view controller to the root view controller. The view controller containment API isn't complex. We start by invoking the addChild(_:) method to notify the parent and child view controllers that the child view controller is about to be added to the parent view controller.
// MARK: - Helper Methods

private func setupChildViewControllers() {
    // Add Child View Controller
    addChild(viewController)
}
The next step is adding the view of the child view controller to the view hierarchy of the parent view controller. We use Auto Layout anchors to define the size and position of the view of the child view controller. As you can see, the view of the child view controller is pinned to the edges of its superview, the view of the parent view controller. Don't forget to activate the constraints. This is often overlooked by developers unfamiliar with adding constraints in code.
// MARK: - Helper Methods

private func setupChildViewControllers() {
    // Add Child View Controller
    addChild(viewController)

    // Add Child View as Subview
    view.addSubview(viewController.view)

    // Configure Child View
    viewController.view.topAnchor.constraint(equalTo: view.topAnchor).isActive = true
    viewController.view.leftAnchor.constraint(equalTo: view.leftAnchor).isActive = true
    viewController.view.rightAnchor.constraint(equalTo: view.rightAnchor).isActive = true
    viewController.view.bottomAnchor.constraint(equalTo: view.bottomAnchor).isActive = true
}
The last step is invoking the didMove(toParent:) method on the child view controller, passing in the parent view controller as the argument. By invoking this method, the parent and child view controllers are notified that the child view controller is added to the parent view controller.
// MARK: - Helper Methods

private func setupChildViewControllers() {
    // Add Child View Controller
    addChild(viewController)

    // Add Child View as Subview
    view.addSubview(viewController.view)

    // Configure Child View
    viewController.view.topAnchor.constraint(equalTo: view.topAnchor).isActive = true
    viewController.view.leftAnchor.constraint(equalTo: view.leftAnchor).isActive = true
    viewController.view.rightAnchor.constraint(equalTo: view.rightAnchor).isActive = true
    viewController.view.bottomAnchor.constraint(equalTo: view.bottomAnchor).isActive = true

    // Notify Child View Controller
    viewController.didMove(toParent: self)
}
That's it. Build and run the application to see the result. You should see a blue view and a tab bar at the bottom. The first tab with title Feed should be selected. Tapping the tab with title Library shows a green view.


With the root view controller in place, we have a foundation we can use in the future without having to worry about architectural problems. Some developers may consider this a form of premature optimization and I can appreciate that point of view. This is how I start every project and it has saved me many headaches.
What's Next?
View controller containment is a useful pattern UIKit offers to add flexibility and modularity to your projects. It has several other useful applications, such as breaking complex user interfaces up into multiple components. I cover view controller containment in more detail elsewhere on Cocoacasts.