Every Xcode project starts out with two build configurations, Debug and Release. The names of these build configurations speak for themselves. The Debug configuration is used to create debug or development builds. Builds destined for TestFlight and App Store are built using the Release configuration. Having a Debug and a Release configuration is sufficient for some projects. Most setups require more flexibility, though.
Let's take the Cocoacasts client as an example. Cocoacasts has a private API the Cocoacasts client communicates with. The API has a staging and a production environment. Features and bug fixes are first deployed to staging and, after testing and validation, staging is promoted to production. As a developer, I want the option to switch between staging and production with very little effort. Having this option is important for both debug and release builds. This implies that the current setup with two configurations won't cut it. I would like to have a Debug and a Release configuration for each environment, staging and production. In this episode, I show you what that solution looks like.
Adding a Dimension
The problem we would like to solve in this episode is more complex than it seems. We could rename Debug and Release to Staging and Production, but that doesn't solve the problem. We want to keep the existing build configurations intact because they define how debug and release builds are created.
We want to introduce the concept of build variants or flavors. Debug and release builds should come in one of two variants or flavors, staging or production. In other words, we don't want to add additional build configurations. We want to add an additional dimension.
Unfortunately, variants or flavors aren't supported by Xcode. The only solution we have is creating additional build configurations. That is the solution I show in this episode, but I want to emphasize that the problem we would like to solve is more subtle. Adding additional build configurations is a workaround and currently the only viable solution.
Staging and Production
Having a staging and a production environment has several advantages. Let me give you a few examples. When you or a group of testers are testing a build of your application, then you may not want the build to interact with production. Having an environment separate from production solves this problem.
Another important benefit relates to deployment. A brand new feature should first be deployed to staging before it's deployed to production. This allows you or your team to perform tests and validations in an environment that doesn't affect production.
There are several other reasons for keeping staging and production separate. Let's assume that your application uses a third party service to manage A/B tests. You don't want to pollute the results of an A/B test with data from testing or development. Issues like this are easily resolved by having separate environments controlled by build configurations.
Switching Between Environments
When you're developing, you interface with the staging environment. That makes sense. At some point, you need to flip the switch and instruct the application to communicate with the production environment. How do you flip that switch? The easiest solution is to manually update the base URL and credentials of the API somewhere in the project. This is easy, but it's prone to errors. I don't recommend this solution. It's inconvenient and, at some point, you forget to switch the base URL and credentials for an App Store build. That is something you need to avoid at any cost.
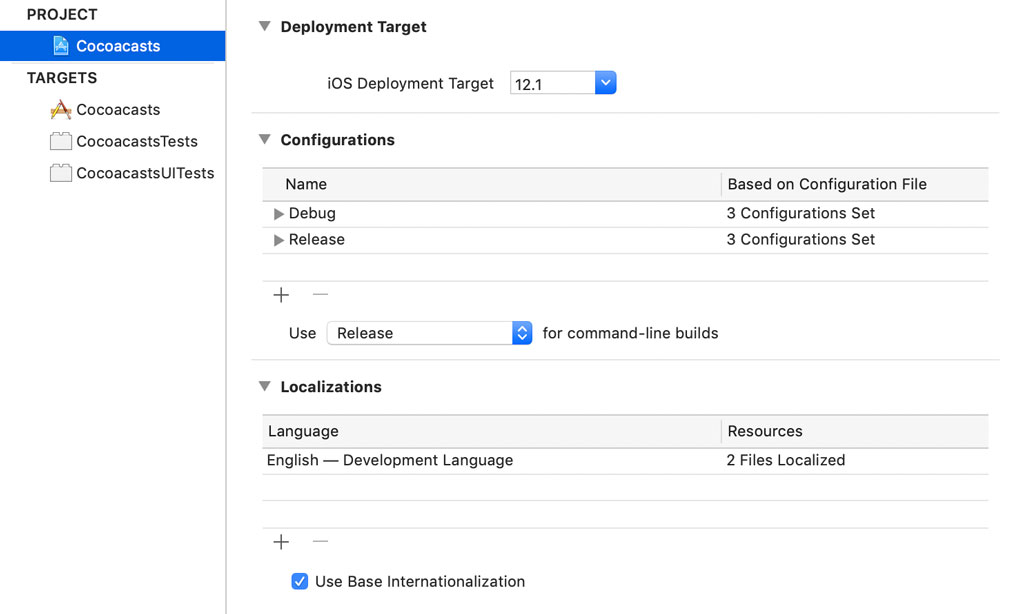
In the previous episode, I emphasized the importance of automation. Not having to make changes after you commit the last changes of a release is an important form of automation. Build configurations can help you with this. A build configuration defines a collection of build settings. The configuration is used to build the product for a target. The project currently defines two configurations, Debug and Release.
The build configurations define the type of build that is created, a debug or a release build. I would like to add more flexibility by adding an additional dimension, the environment the build operates in. A debug or release build should communicate with the staging or the production environment.
The first step is creating two additional build configurations. Select the Debug configuration, click the + button at the bottom of the table, and choose Duplicate "Debug" Configuration. Name the configuration Debug/Production. Rename the Debug configuration to Debug/Staging.
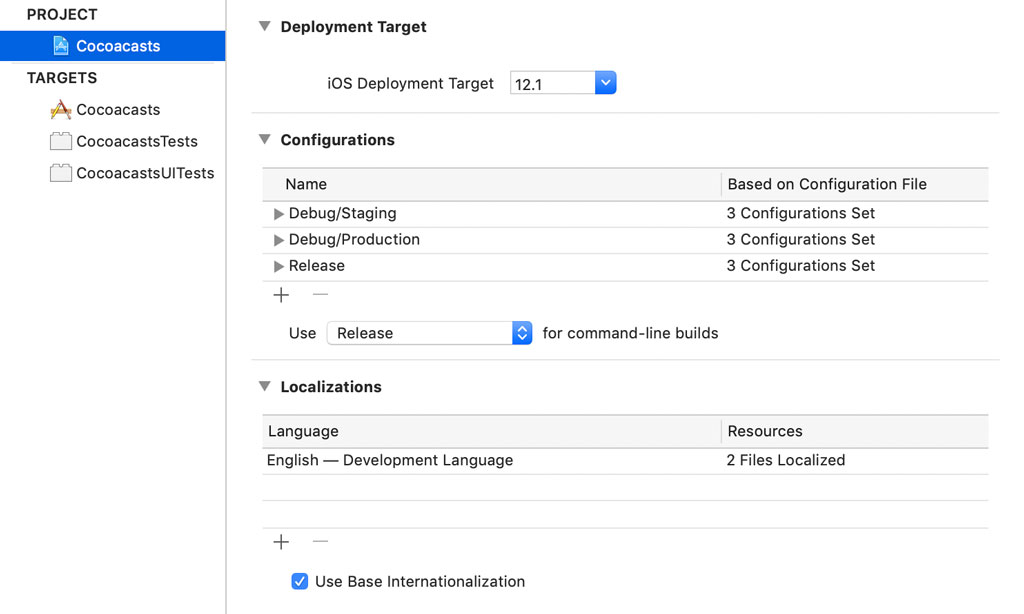
Select the Release configuration, click the + button at the bottom of the table, and choose Duplicate "Release" Configuration. Name the configuration Release/Production. Rename the Release configuration to Release/Staging.
Updating CocoaPods
Before we continue, we need to make a few changes. Open the project's Podfile in a text editor and replace the array of configurations for the Reveal-SDK with an array that contains Debug/Staging and Debug/Production.
target 'Cocoacasts' do
  platform :ios, '12.0'
  use_frameworks!
  inhibit_all_warnings!

  # Wrappers
  pod 'KeychainAccess', '~> 3.1.2'
  pod 'ReachabilitySwift', '~> 4.3.0'

  # Development
  pod 'Reveal-SDK', configurations: ['Debug/Staging', 'Debug/Production']

  target 'CocoacastsTests' do
    inherit! :search_paths
  end

  target 'CocoacastsUITests' do
    inherit! :search_paths
  end
end
Open a terminal and run the pod install command to update the CocoaPods configuration and the Pods project.
bundle exec pod install
Switching Between Environments With Schemes
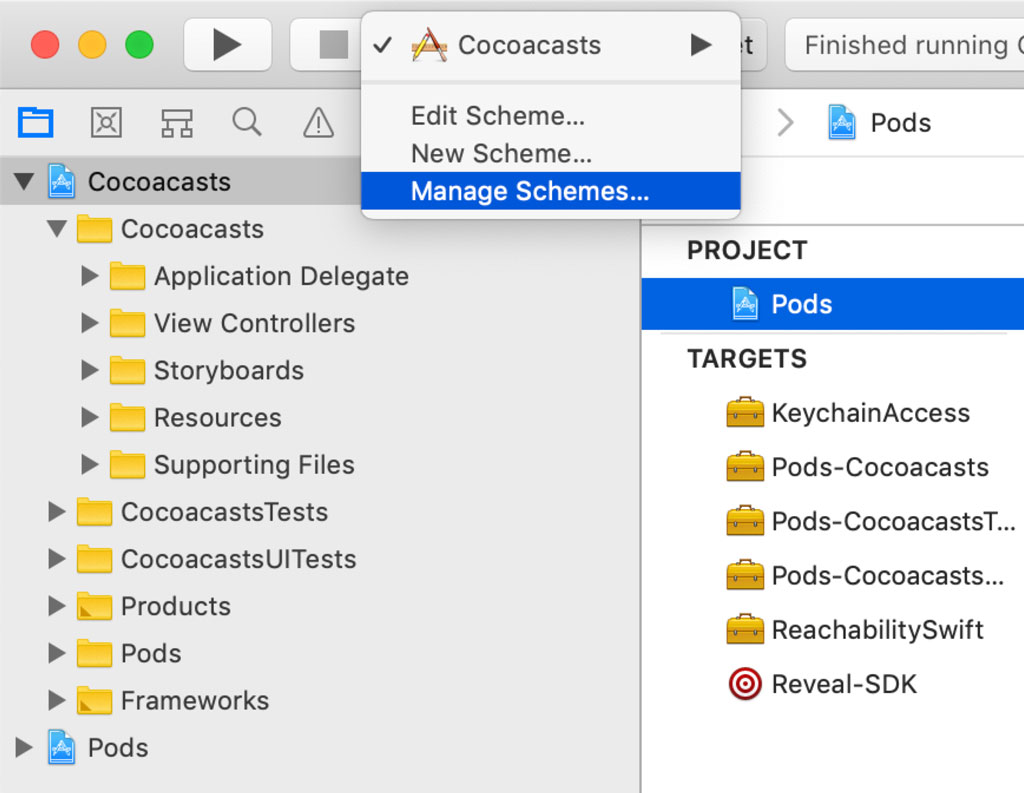
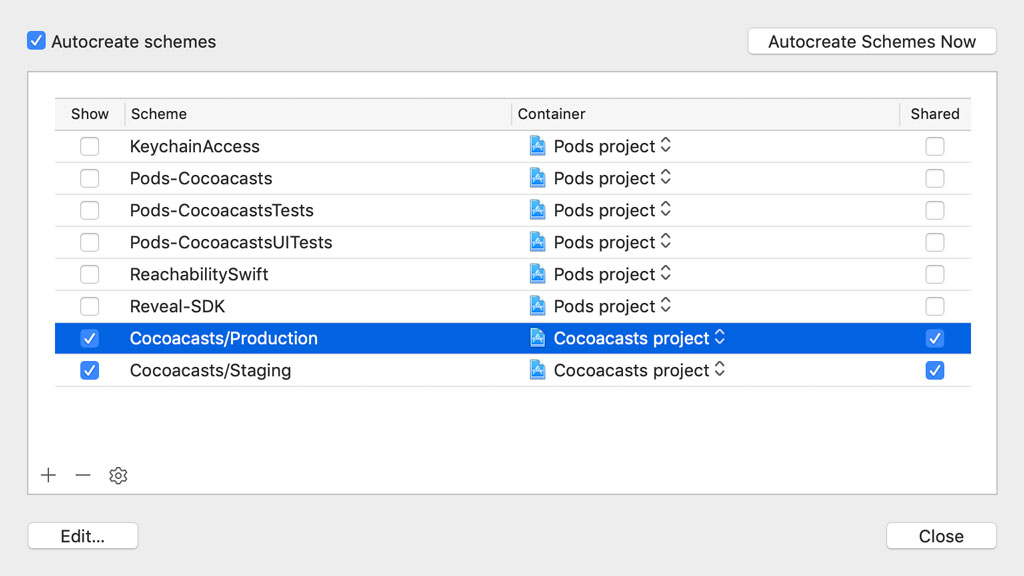
Creating additional build configurations to add support for environments is only the first step. We need the ability to easily switch between environments. To make that possible, we use schemes. Click the scheme in the top left and choose Manage Schemes... from the menu.
Select the Cocoacasts scheme and click it once to edit its name. Change the name to Cocoacasts/Staging.
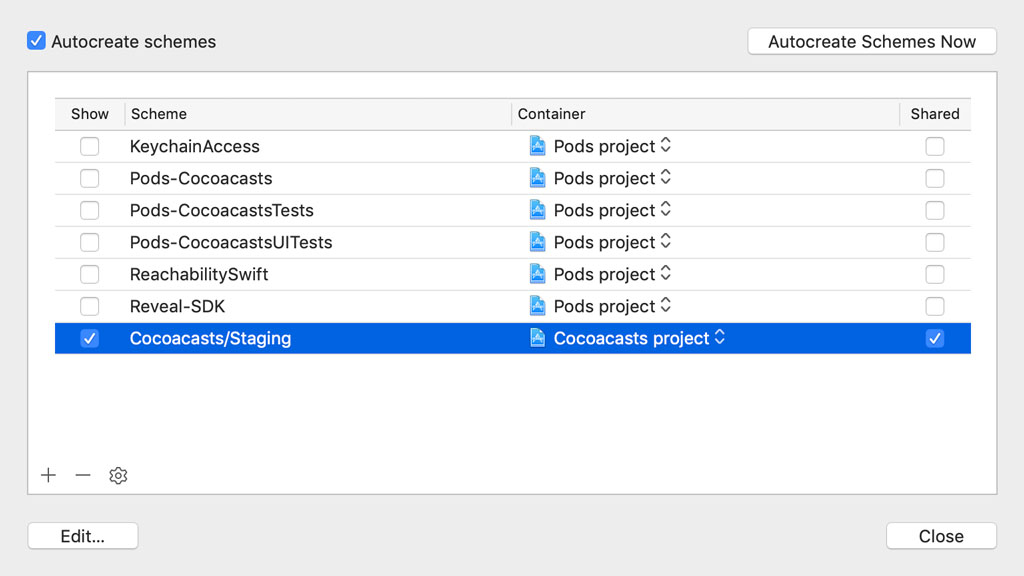
We have a scheme for the staging environment. With the Cocoacasts/Staging scheme selected, click the gear icon at the bottom and choose Duplicate.... Name the scheme Cocoacasts/Production. To make sure other team members have access to the scheme, check the checkbox labeled Shared on the right of the table of schemes.
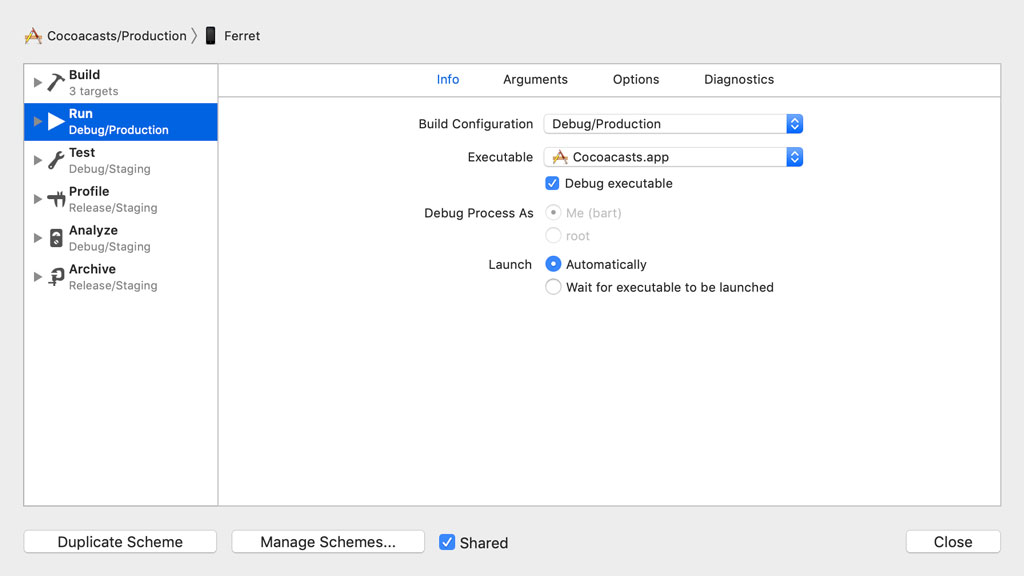
With the Cocoacasts/Production scheme selected, click the Edit button at the bottom to edit it. Click Run on the left and make sure the Info tab is selected. Set Build Configuration to Debug/Production. That's the only change we need to make.
Defining an Environment
A build configuration defines a collection of build settings. These build settings define how the product for the target is created. We can also define custom build settings. These are better known as user-defined build settings.
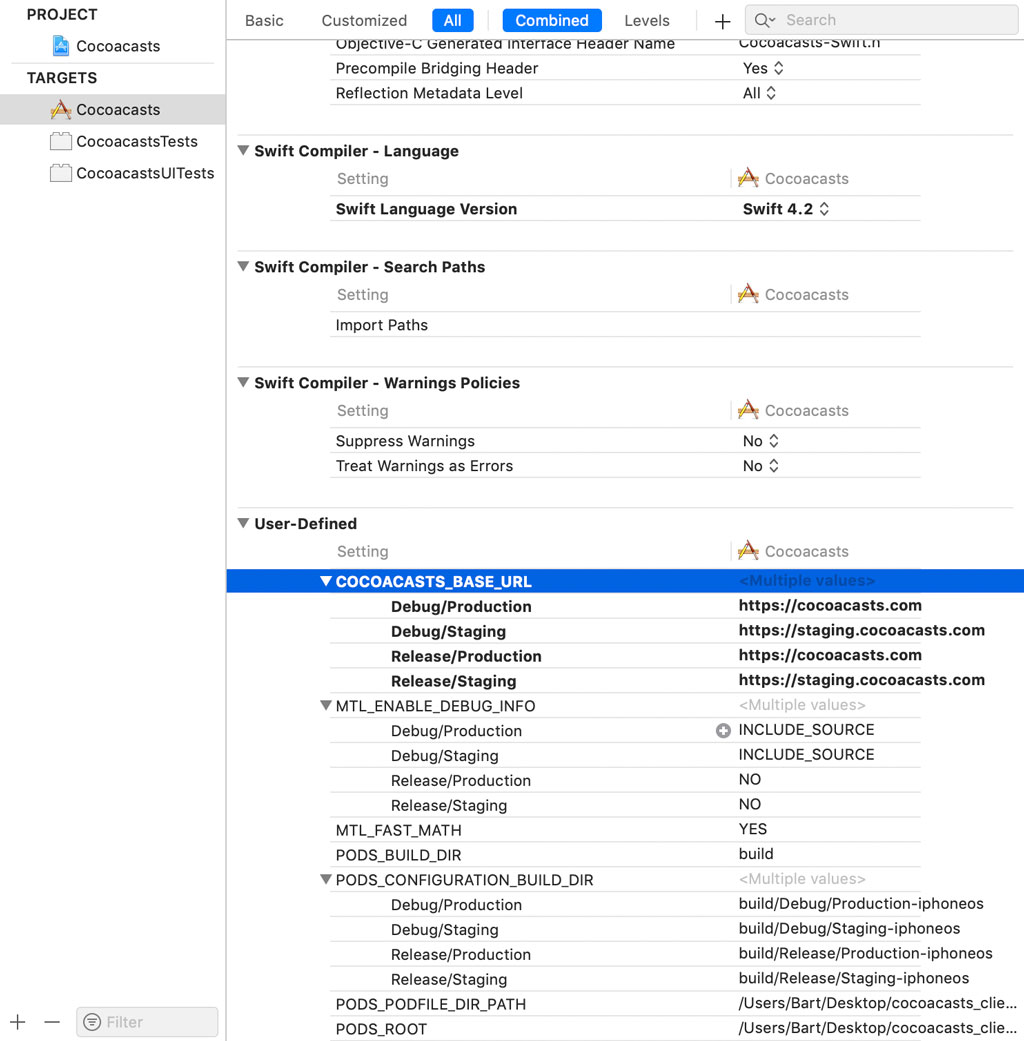
Select the project in the Project Navigator, choose the Cocoacasts target from the list of targets, and open the Build Settings tab at the top. User-defined build settings are listed at the bottom. We can add a user-defined build setting by clicking the + button at the top. Name the user-defined build setting COCOACASTS_BASE_URL.
We can assign a value to the user-define build setting for each build configuration. Click the small triangle on the left to reveal the build configurations. The value we assign for Debug/Staging and Release/Staging is https://staging.cocoacasts.com. The value we assign for Debug/Production and Release/Production is https://cocoacasts.com.
As the name implies, build settings are available at build time. This means that we can't access the value of a user-defined build setting at run time. We can make the value we set for COCOACASTS_BASE_URL available at run time by using variable substitution. Let me show you how that works.
The idea is simple. We copy the value to the target's Info.plist at build time and read the contents of Info.plist at run time. Open Info.plist and add a new key-value pair. Set the key to COCOACASTS_BASE_URL and the value to $(COCOACASTS_BASE_URL).

Let's find out if it worked. Open AppDelegate.swift and navigate to the application(_:didFinishLaunchingWithOptions:) method. We ask the main bundle for the info dictionary and print the value for key COCOACASTS_BASE_URL.
// MARK: - Application Life Cycle

func application(_ application: UIApplication, didFinishLaunchingWithOptions launchOptions: [UIApplication.LaunchOptionsKey: Any]?) -> Bool {
    print(Bundle.main.infoDictionary?["COCOACASTS_BASE_URL"])

    return true
}
Set the scheme to Debug/Staging and run the application in the simulator or on a device. Inspect the output in the console.
Optional(https://staging.cocoacasts.com)
A More Secure Approach
This solution works fine, but we can't use it for sensitive information, such as credentials or API keys. Storing sensitive information in the application's Info.plist is asking for trouble. It isn't difficult to extract the contents of the Info.plist of an application you downloaded from the App Store. We need a more secure approach.
My preferred solution is not only more secure, it is type-safe and easier to use. We start by storing the build configuration with which the build was created in the application's Info.plist. Replace the key-value pair we added earlier. Set the key to CONFIGURATION and the value to $(CONFIGURATION). The value of CONFIGURATION is automatically set for us. Its value is equal to the current build configuration, for example, Debug/Staging or Release/Staging.
Create a new group and name it Configuration. Add a Swift file to the group and name it Configuration.swift. Define an enum with name Configuration and a raw value of type String. We define two cases, debug and release.
import Foundation

enum Configuration: String {

    // MARK: - Configurations

    case debug
    case release

}
The idea is simple. A Configuration instance defines the behavior of the application based on the build configuration. It can for example define the log level of the application. This is something we explore later in this series. To make that possible, we first need to figure out which build configuration was used to build the application. This means we need to access the info dictionary of the main bundle and read the value for key CONFIGURATION.
We define a static constant property, current, of type Configuration. We access the contents of the bundle's Info.plist and read the value for key CONFIGURATION. We are only interested in the first part of the name of the configuration. We split the string that is stored in the bundle's Info.plist and use the first component to create an instance of the Configuration enum. We make ample use of fatal errors because creating a Configuration instance should never fail.
import Foundation

enum Configuration: String {

    // MARK: - Configurations

    case debug
    case release

    // MARK: - Current Configuration

    static let current: Configuration = {
        // Read Value From Info.plist
        guard let value = Bundle.main.infoDictionary?["CONFIGURATION"] as? String else {
            fatalError("No Configuration Found")
        }

        // Extract Configuration
        guard let rawValue = value.split(separator: "/").first else {
            fatalError("Invalid Configuration")
        }

        // Create Configuration
        guard let configuration = Configuration(rawValue: rawValue.lowercased()) else {
            fatalError("Invalid Configuration")
        }

        return configuration
    }()

}
This is only the first step. The application knows through the Configuration enum which build configuration was used at build time.
What we are interested in is the environment the application operates in, staging or production. Create a new file and name it Environment.swift. Define an enum with name Environment and a raw value of type String. We define two cases, staging and production.
import Foundation

enum Environment: String {

    // MARK: - Environments

    case staging
    case production

}
We define a static constant property, current, of type Environment. We use a similar technique to extract the environment from the name of the build configuration. We access the contents of the bundle's Info.plist and read the value for key CONFIGURATION. We are only interested in the second part of the name of the configuration. We split the string that is stored in the bundle's Info.plist and use the second component to create an instance of the Environment enum.
import Foundation

enum Environment: String {

    // MARK: - Environments

    case staging
    case production

    // MARK: - Current Environment

    static let current: Environment = {
        // Read Value From Info.plist
        guard let value = Bundle.main.infoDictionary?["CONFIGURATION"] as? String else {
            fatalError("No Configuration Found")
        }

        // Extract Environment
        guard let rawValue = value.split(separator: "/").last else {
            fatalError("Invalid Environment")
        }

        // Create Environment
        guard let environment = Environment(rawValue: rawValue.lowercased()) else {
            fatalError("Invalid Environment")
        }

        return environment
    }()

}
With the Environment enum in place, we can define properties for the environment the application operates in. What does that look like for the base URL of the Cocoacasts API? We define a static computed property, baseURL, of type URL. We use a switch statement to return a different value for each environment.
// MARK: - Base URL

static var baseURL: URL {
    switch current {
    case .staging:
        return URL(string: "https://staging.cocoacasts.com")!
    case .production:
        return URL(string: "https://cocoacasts.com")!
    }
}
This is one of the few instances in which I use the exclamation mark to force unwrap a value. This is convenient and, more importantly, it doesn't make sense to return an optional value.
Let's give it a try. Open AppDelegate.swift and print the current configuration, the current environment, and the base URL in the application(_:didFinishLaunchingWithOptions:) method. Run the application in the simulator or on a device and inspect the output in the console.
// MARK: - Application Life Cycle

func application(_ application: UIApplication, didFinishLaunchingWithOptions launchOptions: [UIApplication.LaunchOptionsKey: Any]?) -> Bool {
    print(Configuration.current)
    print(Environment.current)
    print(Environment.baseURL)

    return true
}
debug
staging
https://staging.cocoacasts.com
Alternative Solutions
The values that are tied to a configuration or environment are embedded in the project. Some developers consider this a drawback of this solution. An alternative solution makes use of .xcconfig files. An .xcconfig file allows you to further configure the build settings of a configuration. If you're using CocoaPods, then you already use .xcconfig files.
Choose the project in the Project Navigator, select the Cocoacasts project in the main editor, and open the Info tab at the top. In the Configurations section, click the small triangle on the left of the Debug/Staging configuration. It shows the project and the targets of the project. Each target has a configuration file linked to it.
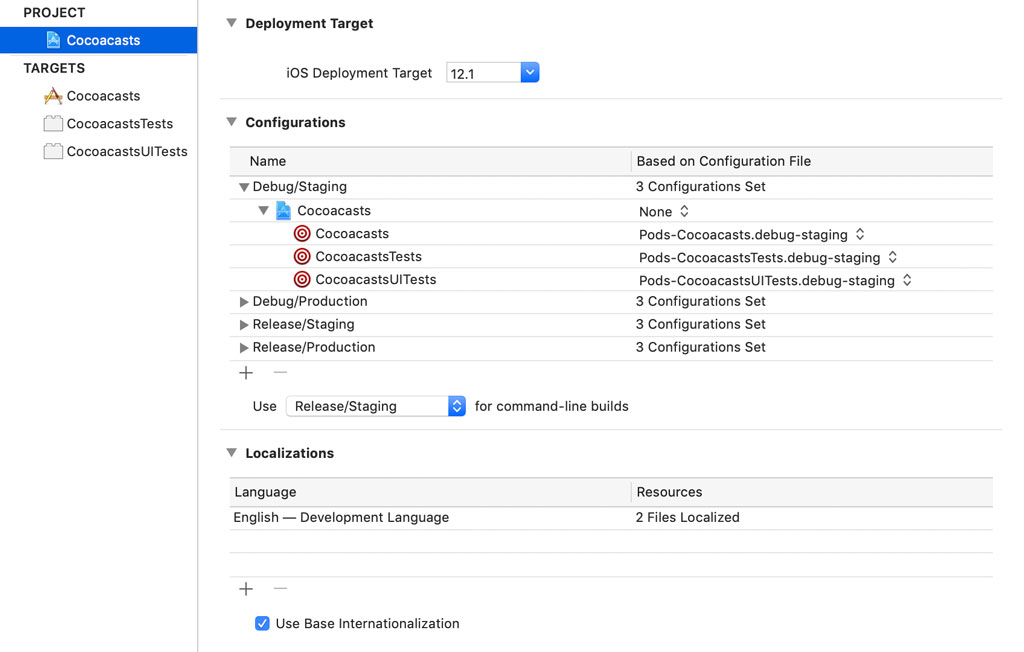
We can inspect these configuration files by opening the Pods group in the Project Navigator. CocoaPods creates an .xcconfig file for each target and for each configuration. Select one of the configuration files and inspect its contents.
ALWAYS_EMBED_SWIFT_STANDARD_LIBRARIES = YES
FRAMEWORK_SEARCH_PATHS = $(inherited) "${PODS_CONFIGURATION_BUILD_DIR}/KeychainAccess" "${PODS_CONFIGURATION_BUILD_DIR}/ReachabilitySwift" "${PODS_ROOT}/Reveal-SDK/RevealServer-21/iOS"
GCC_PREPROCESSOR_DEFINITIONS = $(inherited) COCOAPODS=1
HEADER_SEARCH_PATHS = $(inherited) "${PODS_CONFIGURATION_BUILD_DIR}/KeychainAccess/KeychainAccess.framework/Headers" "${PODS_CONFIGURATION_BUILD_DIR}/ReachabilitySwift/Reachability.framework/Headers"
LD_RUNPATH_SEARCH_PATHS = $(inherited) '@executable_path/Frameworks' '@loader_path/Frameworks'
OTHER_CFLAGS = $(inherited) -isystem "${PODS_CONFIGURATION_BUILD_DIR}/KeychainAccess/KeychainAccess.framework/Headers" -isystem "${PODS_CONFIGURATION_BUILD_DIR}/ReachabilitySwift/Reachability.framework/Headers" -iframework "${PODS_CONFIGURATION_BUILD_DIR}/KeychainAccess" -iframework "${PODS_CONFIGURATION_BUILD_DIR}/ReachabilitySwift" -iframework "${PODS_ROOT}/Reveal-SDK/RevealServer-21/iOS"
OTHER_LDFLAGS = $(inherited) -l"z" -framework "CFNetwork" -framework "CoreGraphics" -framework "KeychainAccess" -framework "QuartzCore" -framework "Reachability" -framework "RevealServer" -framework "SystemConfiguration"
OTHER_SWIFT_FLAGS = $(inherited) -D COCOAPODS
PODS_BUILD_DIR = ${BUILD_DIR}
PODS_CONFIGURATION_BUILD_DIR = ${PODS_BUILD_DIR}/$(CONFIGURATION)$(EFFECTIVE_PLATFORM_NAME)
PODS_PODFILE_DIR_PATH = ${SRCROOT}/.
PODS_ROOT = ${SRCROOT}/Pods
As you can see, an .xcconfig file helps define the build settings of a target for a configuration. This is useful and it's a technique that CocoaPods uses.
Some developers make use of .xcconfig files to define values that are copied to the target's Info.plist and read at run time. This is in some ways similar to adding a user-defined build setting to the target's build settings, which we started this episode with. This is fine for information that isn't sensitive, but, as I explained earlier in this episode, I don't use or recommend this technique for sensitive information.
What's Next?
After building the foundation we built in this episode, it's trivial to expand it as the project grows. The solution I outlined in this episode is more secure than storing information in the bundle's Info.plist, but it's important to know and understand that this solution isn't perfect. If someone with bad intentions wants access to the sensitive information stored in your application's binary, then they can. But that doesn't mean you have to make it easy to extract that information.