Logging is an integral part of my debugging workflow and it's therefore something I invest time in to get right. Swift's print(_:separator:terminator:) function works fine, but it isn't ideal for debugging issues. To use logging effectively in a debugging workflow, you need a powerful and flexible solution.
What Is It?
My library of choice has been CocoaLumberjack for as long as I can remember. CocoaLumberjack has been around for many years. Even though it's powered by Objective-C under the hood, it works just as well if your language of choice is Swift. CocoaLumberjack can be summarized in three words, fast, asynchronous, and versatile. It won't slow down your application if you adopt a sensible logging strategy. CocoaLumberjack was built with speed in mind.
CocoaLumberjack is incredibly versatile. It's easy to set up and it offers a wide range of options to fit the needs of you and your team. This episode only covers the options I use on a daily basis. Let's start by integrating CocoaLumberjack into the project.
Integrating CocoaLumberjack
The project I'm working on uses CocoaPods to manage dependencies, but CocoaLumberjack also supports Carthage. Open the project's Podfile and add CocoaLumberjack as a dependency. Because I'm working on a Swift project, I install the Swift subspec of the CocoaLumberjack pod.
target 'Cocoacasts' do
  platform :ios, '12.0'
  use_frameworks!
  inhibit_all_warnings!

  # Debugging
  pod 'CocoaLumberjack/Swift', '~> 3.5.2'

  # Wrappers
  pod 'KeychainAccess', '~> 3.2'
  pod 'ReachabilitySwift', '~> 4.3.0'

  # Development
  pod 'Reveal-SDK', configurations: ['Debug/Staging', 'Debug/Production']

  target 'CocoacastsTests' do
    inherit! :search_paths
  end

  target 'CocoacastsUITests' do
    inherit! :search_paths
  end
end
Open a terminal and run the bundle exec pod install command to install the dependencies of the project.
bundle exec pod install
I always strive to keep the implementation and complexity of the application delegate to a minimum. Let's move the setup and configuration of CocoaLumberjack into a separate class. Create a new group and name it Debugging. Add a subgroup with name Logging to the Debugging group. Create a Swift file with name Logger.swift and add it to the Logging group. We add an import statement for CocoaLumberjack and define a final class with name Logger.
import CocoaLumberjack

final class Logger {

}
The Logger class defines a single method, a class method with name setup().
import CocoaLumberjack

final class Logger {

    // MARK: - Class Methods

    class func setup() {

    }

}
Because the deployment target of the Cocoacasts target is iOS 12.1, we can take advantage of the unified logging system. The unified logging system is available as of iOS 10.0, tvOS 10.0, macOS 10.12, and watchOS 3.0. Using the unified logging system in combination with CocoaLumberjack is trivial. We invoke the add(_:with:) method of the DDLog class and pass in a reference to the shared instance of the DDOSLogger class.
import CocoaLumberjack

final class Logger {

    // MARK: - Class Methods

    class func setup() {
        // Add os_log Logger
        DDLog.add(DDOSLogger.sharedInstance)
    }

}
That's it. CocoaLumberjack forwards any log messages we send it to the unified logging system. Before we run the application, we need to invoke the setup() method during the launch sequence of the application. Open AppDelegate.swift and invoke the setup() method in the application(_:didFinishLaunchingWithOptions:) method of the AppDelegate class.
// MARK: - Application Life Cycle

func application(_ application: UIApplication, didFinishLaunchingWithOptions launchOptions: [UIApplication.LaunchOptionsKey: Any]?) -> Bool {
    // Setup Logging
    Logger.setup()

    return true
}
Let's try it out. To send a log message to CocoaLumberjack, we invoke one of the five convenience functions CocoaLumberjack exposes:
DDLogVerbose(_:)DDLogDebug(_:)DDLogInfo(_:)DDLogWarn(_:)DDLogError(_:)
Open RootViewController.swift and add an import statement for CocoaLumberjack at the top.
import UIKit
import CocoaLumberjack

class RootViewController: UIViewController {

    ...

}
Navigate to the viewDidLoad() method and invoke DDLogVerbose(_:) and DDLogError(_:).
override func viewDidLoad() {
    super.viewDidLoad()

    // Setup Child View Controllers
    setupChildViewControllers()

    DDLogVerbose("This is a verbose log.")
    DDLogError("This is an error log.")
}
Build and run the application in the simulator or on a device and inspect the output in the console.
2019-04-13 16:10:28.378543+0200 Cocoacasts[866:131634] This is a verbose log.
2019-04-13 16:10:28.381214+0200 Cocoacasts[866:131636] This is an error log.
Defining a Default Log Level
During development, you want to log pretty much everything there is to log. That isn't true for production. Logs can have an impact on performance and they often contain sensitive information, which you don't want to output in production. This means that we want to keep logging to a minimum in production.
There's no need to add conditional logic to every log statement if you choose for CocoaLumberjack. It suffices to define a log level for each logger that is added to CocoaLumberjack. Let me show you how this works. You can pass a log level to the add(_:with:) method of the DDLog class. It specifies which log messages are forwarded to the logger that is passed to the add(_:with:) method. You can define the log level for each logger, but I usually define a default log level that is enforced on every logger that is added.
In Logger.swift, we define a static, constant property, defaultLogLevel, of type DDLogLevel. For debug builds, we set defaultLogLevel to all. For other builds, we set defaultLogLevel to error.
import CocoaLumberjack

final class Logger {

    // Define Log Level
    #if DEBUG
    static let defaultLogLevel: DDLogLevel = .all
    #else
    static let defaultLogLevel: DDLogLevel = .error
    #endif

    // MARK: - Class Methods

    class func setup() {
        // Add os_log Logger
        DDLog.add(DDOSLogger.sharedInstance)
    }

}
We pass the value stored in defaultLogLevel to the add(_:with:) method of the DDLog class to specify which log messages should be forwarded to the unified logging system.
import CocoaLumberjack

final class Logger {

    // Define Log Level
    #if DEBUG
    static let defaultLogLevel: DDLogLevel = .all
    #else
    static let defaultLogLevel: DDLogLevel = .error
    #endif

    // MARK: - Class Methods

    class func setup() {
        // Add os_log Logger
        DDLog.add(DDOSLogger.sharedInstance, with: defaultLogLevel)
    }

}
Let's try this out by changing the value of defaultLogLevel for debug builds to error. Run the application.
// Define Log Level
#if DEBUG
static let defaultLogLevel: DDLogLevel = .error
#else
static let defaultLogLevel: DDLogLevel = .error
#endif
Only the log message with log level error shows up in Xcode's console.
2019-04-13 17:18:28.381214+0200 Cocoacasts[866:131636] This is an error log.
Stop the application and set the value of defaultLogLevel for debug builds to all.
// Define Log Level
#if DEBUG
static let defaultLogLevel: DDLogLevel = .all
#else
static let defaultLogLevel: DDLogLevel = .error
#endif
Customizing the Log Format
As a project grows and evolves, the number of log messages that show up in the console grows. It can at times be difficult to make sense of the log messages. Even warnings and errors drown in the flood of output in Xcode's console. There's a simple solution to this problem that is often overlooked. Let me show you what that solution looks like. We start by creating a custom log formatter. This is nothing more than an object that defines the format of a log message. Each logger can have its own log formatter.
Create a Swift file in the Logging group and name it LogFormatter.swift. Add an import statement for the CocoaLumberjack library and define a class, LogFormatter, that inherits from NSObject.
import CocoaLumberjack

class LogFormatter: NSObject {

}
A log formatter needs to adopt the DDLogFormatter protocol. This protocol requires that the conforming type conforms to the NSObjectProtocol protocol, which is why LogFormatter inherits from NSObject.
import CocoaLumberjack

class LogFormatter: NSObject, DDLogFormatter {

}
Adopting the DDLogFormatter protocol isn't complex. The conforming type needs to implement one method, format(message:). The method has a return type of String?.
import CocoaLumberjack

class LogFormatter: NSObject, DDLogFormatter {

    func format(message logMessage: DDLogMessage) -> String? {

    }

}
The format(message:) method accepts one argument of type DDLogMessage. The DDLogMessage object contains the information we need to create a custom log message. We inspect the log level of the log message and convert the log level to a string.
// MARK: - DDLogFormatter

func format(message logMessage: DDLogMessage) -> String? {
    // Helpers
    let logLevel: String

    switch logMessage.flag {
    case .error:    logLevel = "ERROR"
    case .warning:  logLevel = "WARNING"
    case .debug:    logLevel = "DEBUG"
    case .info:     logLevel = "INFO"
    default:        logLevel = "VERBOSE"
    }
}
The DDLogMessage object also includes other useful information, such as the message, the file name, the line number, the timestamp, and the name of the function. We use this information to create a useful log message and return the result.
// MARK: - Properties

private let dateFormmater: DateFormatter = {
    // Initialize Date Formatter
    let newDateFormatter = DateFormatter()

    // Configure Date Formatter
    newDateFormatter.dateFormat = "yyyy/MM/dd HH:mm:ss:SSS"

    return newDateFormatter
}()

// MARK: - DDLogFormatter

func format(message logMessage: DDLogMessage) -> String? {
    // Helpers
    let logLevel: String

    switch logMessage.flag {
    case .error:    logLevel = "ERROR"
    case .warning:  logLevel = "WARNING"
    case .debug:    logLevel = "DEBUG"
    case .info:     logLevel = "INFO"
    default:        logLevel = "VERBOSE"
    }

    // Helpers
    let message = logMessage.message
    let fileName = logMessage.fileName
    let line = logMessage.line
    let timeStamp = dateFormmater.string(from: logMessage.timestamp)

    if let function = logMessage.function {
        return "\(timeStamp) | \(fileName):\(line) - \(function) | [\(logLevel)] \(message)"
    } else {
        return "\(timeStamp) | \(fileName):\(line) | [\(logLevel)] \(message)"
    }
}
Putting the custom log formatter to use is simple. Open Logger.swift and revisit the setup() method. We create an instance of the LogFormatter class and assign it to the logFormatter property of the DDOSLogger shared instance.
// MARK: - Class Methods

class func setup() {
    // Configure os_log Logger
    DDOSLogger.sharedInstance.logFormatter = LogFormatter()

    // Add os_log Logger
    DDLog.add(DDOSLogger.sharedInstance, with: defaultLogLevel)
}
Run the application to see the result. This looks nice, but there's one problem. The unified logging system prefixes every log message with the timestamp of the log message and the name of the process. That's something we don't want.
2019-04-15 17:49:02.582455+0200 Cocoacasts[920:148103] 2019/04/15 17:49:02:581 | RootViewController:32 - viewDidLoad() | [VERBOSE] This is a verbose log.
2019-04-15 17:49:02.582579+0200 Cocoacasts[920:148106] 2019/04/15 17:49:02:581 | RootViewController:33 - viewDidLoad() | [ERROR] This is an error log.
We can remedy this by using the DDTTYLogger class instead of the DDOSLogger class. The DDTTYLogger class forwards log messages to the terminal or Xcode's console. The changes we need to make are small.
// MARK: - Class Methods

class func setup() {
    // Configure TTY Logger
    DDTTYLogger.sharedInstance.logFormatter = LogFormatter()

    // Add TTY Logger
    DDLog.add(DDTTYLogger.sharedInstance, with: defaultLogLevel)
}
Run the application and inspect the output in Xcode's console. That looks better.
2019/04/15 17:50:03:401 | RootViewController:32 - viewDidLoad() | [VERBOSE] This is a verbose log.
2019/04/15 17:50:03:402 | RootViewController:33 - viewDidLoad() | [ERROR] This is an error.
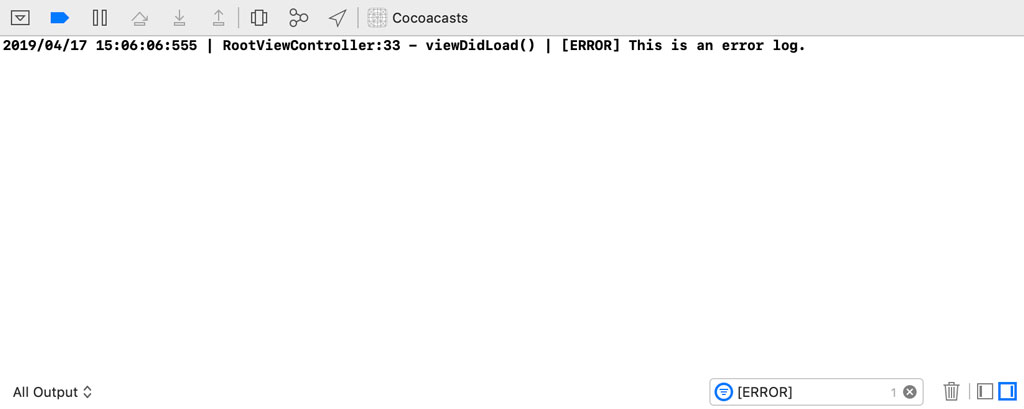
Filtering Log Messages
You probably know that you can search the output of Xcode's console by pressing Command + S. What some developers don't know is that you can also filter log messages. This is useful and very easy thanks to the custom log formatter we implemented earlier. We can use the log level of the log message to only show the log messages we're interested in. Or we can show log messages that originate in the RootViewController class. Filtering log messages is pretty powerful and it's sometimes more convenient than browsing or searching the output of Xcode's console for the log messages you're interested in.
What's Next?
As I mentioned in the introduction of this episode, logging is an integral part of my debugging workflow. I use it more than anything else to debug issues. CocoaLumberjack takes logging to the next level. We only scratched the surface in this episode. You should see CocoaLumberjack as a central point where every log message arrives. CocoaLumberjack decides where log messages are sent to, what format they're in, and how they should be filtered.
In the next episode, we take it one step further. I'm sure there have been times that you wanted to access the logs of a user in production to debug a difficult or impossible to reproduce issue. That's possible using CocoaLumberjack. Like I said, you can send the log messages CocoaLumberjack collects anywhere you want, including a remote server.